Making Games with Game Editor
Game Editor is a multiplatform tool for 2D-games development based on events and actions.
It is possible, with this tool, to create games in a quite intuitive way. Imagine that you have a large table at your disposition.
Now, place on the table the objects that compose your game.
On this table you can see all your game and have a good notion of the positioning of the objects.
That's Game Editor; it is your large table, your work area where the objects are manipulated in a visual way.
Some Basic Concepts
Before beginning to use Game Editor, it's necessary to keep in mind some basic concepts
Actors are your objects, the characters of your game.
Each actor can have a group of animations linked to it, can be parented by another actors, follow a path, be transparent, be a text, among others.
Animation is the static image or group of images in sequence that represents an actor on screen. By the concept, one can notice that not all animations are actually "animated".
Event is something that happens during the game, as for example, when the user presses a key, or clicks with the mouse, or when an actor collides with another.
Action is what should happen in response to an event. For example, when an actor collides with a rocket an explosion should be created. Game Editor has a set of predefined actions; any event can fire one or more actions.
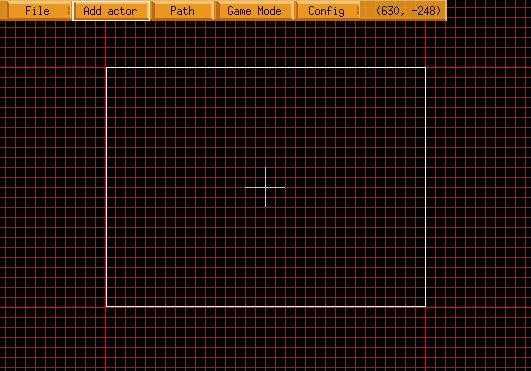
Understanding the Interface
The main screen of Game Editor shows a grid to aid with positioning, a white cross and a white rectangle, besides the main menu.
The thicker red lines of the grid have the dimensions that you determine for the resolution of your game.
The white cross marks the center of your world, that is, coordinates (0, 0).
The white rectangle is a special actor called " view actor ".
The view actor is actually the camera that focuses the part of your game that should be shown in a given moment; it has the same attributes of an user-created actor, with the exception that it cannot have animations linked to it.
Making a simple game
To explain better and to help in settling the concepts, we will create a small game based on old Moon Patrol, that we will call Moon Defender.
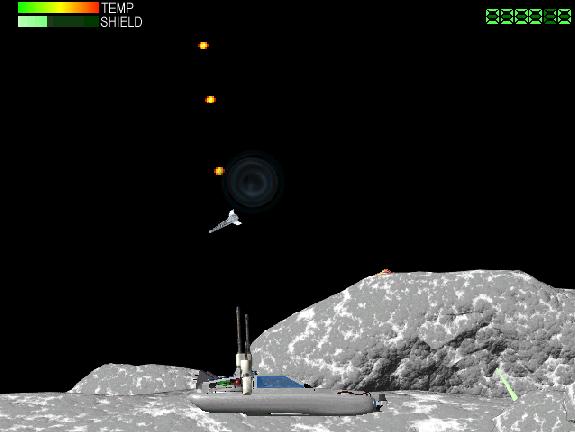
In this game, you control a lunar vehicle equipped with a cannon and a force shield. your mission is to destroy the heat-guided rockets that are launched in your direction and to escape from the laser barriers that repel the vehicle. If the canyon warms up too much, it will become unable to shoot until it gets cold enough.
The controls are:
- Right ctrl: shot
- Spacebar: jump
- Left/right Arrows: move
- Mouse: controls the aim of the cannon
While we move along the tutorial, we will introduce the necessary additional concepts about Game Editor.
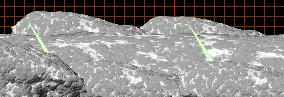
Initially, we will create the actor that represents the moon. To create a new actor, click "Add Actor " in the main menu.
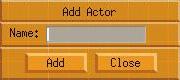
Type the actor name in the dialog box and click "Add". We will call our actor "land".
It will appear as a pac-man on screen
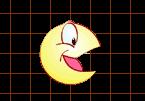
That pac-man represents our actor when there isn't any animation associated with it.
Adding Animations
Right-click the actor to open the "Actor Control" panel
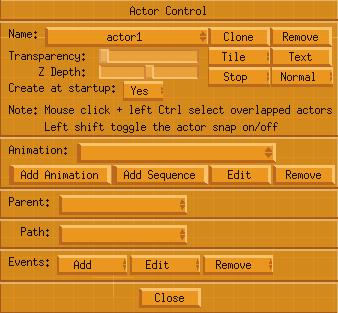
In this panel we have all that is necessary to set up our actors.
Click "Add Animation" to insert a new animation:
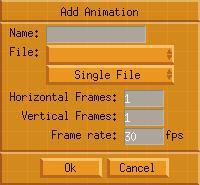
In this panel, you define the name of the animation and select the image file (it supports tga, jpeg, bmp, png, xpm, xcf, pcx, gif and tif formats). If your animation is contained in one file, select "Single File" and specify how many frames of your animation that file represents. You may want to set up your animation in a single file with all the frames side by side. So, you tell how many horizontal and vertical frames are in your animation. But you may have your animation in a sequence of files. In that case, the files should be named in the following way:
file001.ext, file002.ext, file003.ext,...
Where "file" is the name of your animation and "ext" it is the file extension. Selecting any of these files and choosing the option "Multiple Files" makes Game Editor automatically load the whole animation for you.
In "Frame rate" you specify in which speed your animation should run.
A detail here: if your image has a color depth lower than 32 bits, Game Editor understands that the color of the first pixel (upper left corner) is the color that should become totally transparent in the image. If your image has 32bits color depth, Game Editor will consider the alpha channel (transparency channel) of the image.
Now that we already know how to use the "add animation" panel, let's return to our small game.
Type the parameters of the animation:
Name: land
File: land.png (that accompanies this tutorial)
Select " Single File "
Horizontal Frames: 1
Vertical Frames: 1
Frame Rate: any value (as our animation only has one picture, that parameter will be ignored)
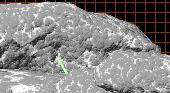
Click "Ok" and you'll
see that the actor now has the new image that you defined.
Move the actor to the bottom of the
view. To move an actor, click it and drag it to anywhere you want.
Some tips: notice that the image is very large in width; to see it completely, maximize Game Editor window and use the "<" and ">" keys to decrease or to increase the zoom, as you prefer.
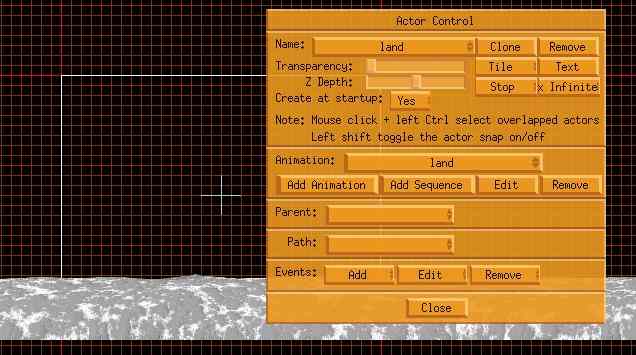
Infinite actors
Notice that the land image is large, but when our lunar vehicle begins to move, soon the land won't be seen anymore. To solve this, we'll turn that actor into an infinite actor. An infinite actor repeats itself along the horizontal axis (x axis) and vertical axis (y axis) of the screen. To make an actor infinite, open the "Actor Control" panel (right-click the actor, if the panel isn't showing), click the list which reads "Normal" and select the option " x Infinite ". OK, our actor is now horizontally spread along the whole game.
Improving the scenery
Our scenery still looks a kind of empty; we will spread some rocks to improve it.
We'll add two actors, "rock1" and "rock2", and place them a little away one from the other.
Add to rock1 the following animation:
Name: rock1
File: rock1.png
Select "Single File"
Horizontal Frames: 1
Vertical Frames: 1
Frame Rate: any value
Add to rock2 the following animation:
Name: rock2
File: rock2.png
Select "Single File"
Horizontal Frames: 1
Vertical Frames: 1
Frame Rate: any value
Now, in the "Actor Control" panel,
click the "clone" button to create some copies of these actors.
A clone has all the animations, events and
actions of the original actor.
Actually, there's no difference between the original and cloned actors.
Adding new animations, events or actions to any of them will be affect all the others.
Distribute those rocks now along the scenery placing some of them in front of the land and others behind the land.
To do that, slide the "Z Depth" control in Actor Control.
"Z Depth" is good to adjust an actor's depth in the game.
Increasing Z Depth makes the actor look as if it's closer to you.
The result should resemble that:

Another element that we'll place are the "repelling barriers". They will be actors that, when colliding with our lunar vehicle, will push it far away.
The "laser" actor serves as barrier for the lunar vehicle. When the vehicle collides with the laser, it will be pushed to the opposite direction. Add the laser actor and place the following animation:
Name: laser
File: laser.png
Select " Single File "
Horizontal Frames: 1
Vertical Frames: 1
Frame Rate: any value
Create two clones and position them between two rocks, altering Z Depth as necessary.
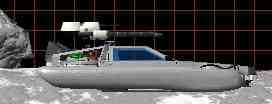
The lunar vehicle is composed by two actors: the car and the cannon
Add the "car" actor and place the following animation:
Name: car
File: car.png
Select " Single File "
Horizontal Frames: 1
Vertical Frames: 1
Frame Rate: any value
Add the "gun" actor and place the following animation:
Name: gun
File: cargun000.png (or any other file of this sequence)
Select " Multiple Files "
Horizontal Frames: do not fill
Vertical Frames: do not fill
Frame Rate: 30 (this animation was made to run at 30 frames per second)
We'll now make car gun's father, so that when car moves, gun also moves.
Right-click gun to open the "Actor Control" panel and, in "Parent" list, choose "car" actor.
Position "gun" so that it's right above "car".
Actors created on demand
Some actors should not be created in the beginning of the game, but when some
eventhappens.
In our game, those actors are: "cartrace", "sand", "lightex", "rocket" and "shot".
Those actors can be positioned anywhere out of your main vision field.
To set an actor not to be created in the beginning of the game, change the option "Create at startup" to "No" In the "Actor Control" panel.
Let's set them up now:
The "cartrace" actor is used to make the "car" leave a trace when it stomps on the "land" actor.
Add the "cartrace" actor and set the following
animation:
Name: trace
File: cartrace.png
Select "Single File"
Horizontal Frames: 1
Vertical Frames: 1
Frame Rate: any value
The "sand" actor is used to spread some dust when the "car" actor stomps on the "land" actor.
Add the "sand" actor and set the following
animation:
Name: sand
File: sand000.png (or any other file of this sequence)
Select "Multiple Files"
Horizontal Frames: do not fill
Vertical Frames: do not fill
Frame Rate: 30 (this animation was made to run at 30 frames per second)
The "lightex" actor represents a light explosion that happens when the "rocket" actor collides with the "car" actor or the "shot" actor.
Add the "lightex" actor and set the following
animation:
Name: light explosion
File: lightex001.png (or any other file of this sequence)
Select "Multiple Files"
Horizontal Frames: do not fill
Vertical Frames: do not fill
Frame Rate: 30 (this animation was made to run at 30 frames per second)
The "rocket" actor is the rocket that tries to destroy the lunar vehicle.
Add the "rocket" actor and set the following
animation:
Name: rocket
File: rocket001.png (or any other file of this sequence)
Select "Multiple Files"
Horizontal Frames: do not fill
Vertical Frames: do not fill
Frame Rate: 30 (this animation was made to run at 30 frames per second)
The "shot" actor is used by the "car" actor to destroys "rocket" actors.
Add the "shot" actor and set the following
animation:
Name: shot
File: shot1.bmp
Select "Single File"
Horizontal Frames: 1
Vertical Frames: 1
Frame Rate: any value
Each actor can have its transparency adjusted separately through the slide control in the
"Actor Control" panel.
Initially, transparency for all actors is zero.
We need to alter the transparency of the actor "cartrace" to visually mix it with the "land" actor. Set its transparency to a little less of the half of the control (approximately 40%).
Our rockets will be launched fro bases behind some rocks.
Add the "rocket_base" actor and make two
clones, positioning them behind some rocks,
as you prefer.
It isn't necessary to set an animation.
Later, we will see how to make them launch rockets.
Our score is formed by three displays: the counter for the points earned on the game ("score" actor), the shield counter ("shield_meter" actor) and the temperature counter for the cannon ("meter" actor). To make the two latter work, we'll placed two more actors: "shieldhide" and "temphide" with the function of showing or hiding the counters as necessary. Lastly, we'll place the "panel" actor that will be a frame for the score.
Notice that when we move the lunar vehicle the view should follow its movement. Then, to make the score appear fixed on screen, the view should be parent of the actors "shield_meter", "meter", "shieldhide", "temphide" and "panel". The "score" actor should be a child of "panel", so that it appears in front of it.
Begin creating the actors "meter" and "shield_meter":
Add the "meter" actor and set the following animation:
Name: meter
File: meter.png
Select "Single File"
Horizontal Frames: 1
Vertical Frames: 1
Frame Rate: any value
Add the "shield_meter" actor and set the following animation:
Name: shield
File: meter1.png
Select "Single File"
Horizontal Frames: 1
Vertical Frames: 1
Frame Rate: any value
Position them one below the other on the upper left corner of the view and set
the view as their parent.
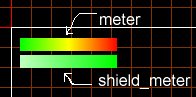
Those two displays should behave like this: iniatially, "shield_meter"
appears entirely, indicating that the shields are with full force, and "meter"
appears fully hidden by "temphide", indicating that the cannon is
cold.
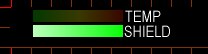
Add the actors "temphide" and "shieldhide" now:
Add the "temphide" actor and set the following
animation:
Name: temphide
File: meterhide.png
Select "Single File"
Horizontal Frames: 1
Vertical Frames: 1
Frame Rate: any value
Add the "shieldhide" actor and set the following
animation:
Name: shieldhide
File: meterhide.png
Select "Single File"
Horizontal Frames: 1
Vertical Frames: 1
Frame Rate: any value
Position "temphide"so that it completely covers "meter";
position "shieldhide" to the right side of "shield_meter"
and set the view as their parent.
![]()
For a more accurate positioning, we can use "actor snap". With actor snap, an actor will stick to the closest actor, when we move it. Actor snap is activated by pressing left shift key. Pressing it again, the function is disabled.
Adjust the transparency of both to approximately 25%.
Now, add the "panel" actor and set the following
animation:
Name: panel
File: panel.png
Select "Single File"
Horizontal Frames: 1
Vertical Frames: 1
Frame Rate: any value
Position panel so that meter and shield_meter are inserted in the two spaces
on the left side of panel
Finally, add the "score" actor, but it don't set an animation yet.
Text actor
"Score" is a special actor that represents a text on screen. In our
case, the digits of the score.
To create a text actor, click the button " Text" in the "Actor
Control" panel and you'll see the following dialog box:
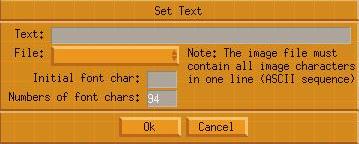
In the "Text" field you may write the text that you want to appear.
In "file", select an image file that contains all the letters and
digits side by side following the sequence defined by the ASCII table:
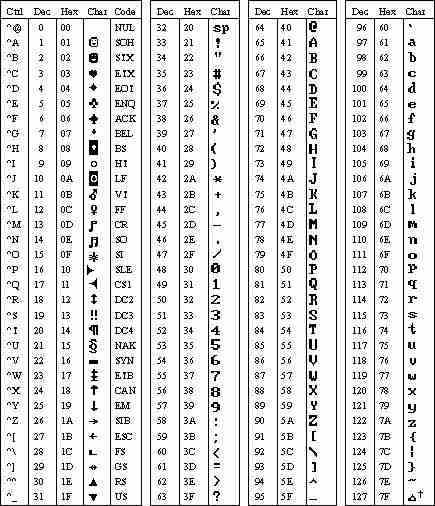
If you want to show just the digits, it's enough to create an image file with the digits in the order 0123456789
![]()
In "Initial font char" you set which is the initial character of
your image file.
In "Number of font chars" you set how many characters exist in your
file.
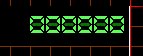
For our score, set the following parameters:
Text: 000000
File: numbers.png
Initial font char: 0
Number of font chars: 10
Set "panel" actor as score parent and position
it on the right side of the screen.
Getting everything to work
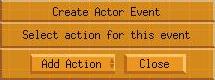
Now that we have all the actors positioned, we'll bring them to life. To do
that, we'll now specify the events for our actors. To select an event, click
it's "Add" list in the session "Events" of
"Actor Control" panel.
We'll follow from less to more difficult, so that you get used to it.
Light explosion
The "lightex" actor, after created, should
stop existing as soon as its animation finishes. To do this, we'll use the "Animation
Finish" event.
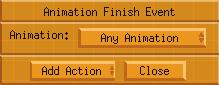
This event happens when the actor's current animation finishes. If no action is specified, the animation is resumed. You may want to specify that an action should happen when a certain animation of the actor finishes, or when any the actor's animation finish. For the latter case, select "Any Animation".
Now we should specify which action should happen by clicking the "Add
Action" list.
Select "Destroy Actor":
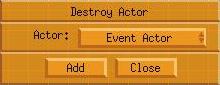
You should specify which actor should be destroyed.
Notice that in the list has a special actor called "Event Actor".
When "Event Actor" is specified, that means the action should happen
to the actor that received the event.
Select "Event Actor" and click "Add". Two options will appear:
"Immediate action" and "Wait for frame action".
When we add an action, we may want it to happen immediately:
that's "Immediate action" option.
For actors with complex animations, however, we may just want to schedule an
action so that it happens when a certain frame of an animation is shown (for
example, when an actor places his feet on the ground); that's the case of the
"Wait for frame action" option
Select the "Immediate action" option.
Click the button "Close" to close the panel of the event.
OK, "lightex" actor now does what we want.
Lunar dust
As well as "lightex", "sand" should also be destroyed when
its animation ends. Repeat, same steps we took with lightex.
When "sand" is created, we'll make
it emit a sound. We'll use the "Create Actor" event:
Now select the "Play Sound" action:
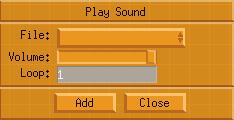
In this action, you should specify the sound file (it supports the wav, voc
and iff formats), the volume and how many times it should be played.
For "sand", select the file "sand.wav", leave the volume
in the maximum and loop in 1.
Click "Add" and select "Immediate action".
Click "Close" to close the panel of the event.
Now, when our "sand" actor is created, it'll emit a sound and, when
its animation finishes, it'll be destroyed.
Laser Barrier
The "laser" actor should push the lunar vehicle far away when they collide. Select the "Collision" event:
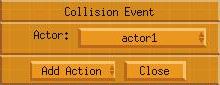
Indicate which is the actor we want to set a collision event with.
Select the "car" actor and add the "Script Editor" action:
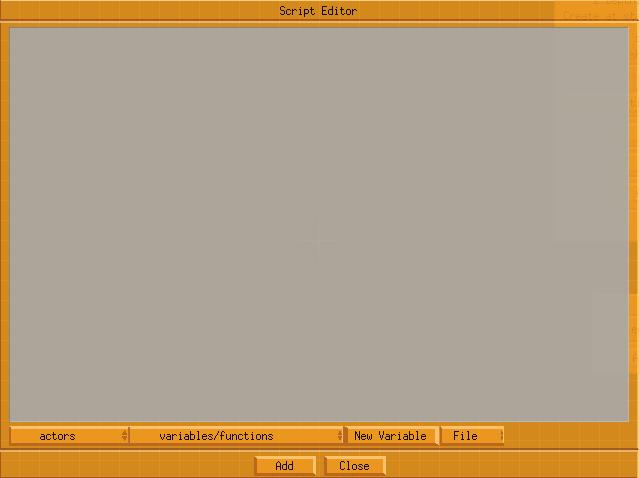
Our script editor uses as language the C programming language. C was chosen because it's already known by a great user base. Information on the language can be found in the Internet.
The "actors" and "variable/functions" lists are good to lessen typing. The "actors" list, shows all the available actors and the "variable/functions" list shows all the available variables and functions.
All actions can be activated through scripts. When an action is selected in the function list, its corresponding dialog box will pop-up.
The "New variable" button is used to create a new variable in the
game, as a score counter, for example.
To make the "laser" actor push "car" in the direction opposed
to its movement, type the following lines:
collide.xvelocity = -30*sign(collide.xvelocity);
PlaySound("shields.wav", 1.0, 1);
|
Explanation:
To repel "car", we need to alter its horizontal speed; that is, xvelocity.
Actually, we are saying that any actor that collides with the laser is repelled,
because we are using the special actor "collide", that represents
any actor that's colliding.
The number 30 is indicating the speed the actor should have after the
collision.
The less sign indicates that the direction of movement should be contrary
to the current direction.
For us to know which is the current horizontal direction, we use the "sign"
function to give us the sign of collide.xvelocity. If the speed is positive
(actor is moving left to right) "sign" will return 1. If the
speed is negative (actor is moving right to left) "sign" will
return -1.
Finally, when we finish typing a command in C, we need to add a semicolon.
Still in Script Editor, we can place the "Play Sound"
action. Select this action in the function list and choose the file "shields.wav".
Now, click "Add" in Script Editor and select "
Immediate action" to finish the action.
Click "Close" to close the panel of the event.
Rocket base
The "rocket_base" actor should launch
the rockets in random intervals when the lunar vehicle comes close enough to
it.
So, we need to create a timer when the actor is created, and create an action
to fire at that timer interval.
Add the "Create Actor" event and select the "Create Timer"
action:
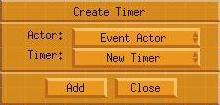
Select the actor that will receive the timer event. In our case, "Event
Actor".
As we don't any timer defined yet, select "New Timer" in the "Timer"
list:
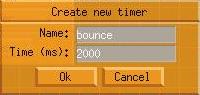
Specify the name of the new timer and the interval in millisseconds. For the rocket base you must set:
Name: rocket
Timer: 1000
Click "Ok", then click "Add" to add the action and select
"Immediate action".
Click "Close" to close the panel of the event.
Now, select the "Timer" event:
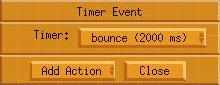
Select the timer that you has just created and add the "Script Editor" action. To make the action do what we want, that is, launch rockets at random times when the actor car is near, type the following:
DestroyTimer("rocket");
CreateTimer("Event Actor", "rocket", rand(4000)+1000);


if(distance(x, y, car.x, car.y) < view.width)
{
  CreateActor("rocket", "rocket", "no parent", "no path", 0, 0, false);
}
|
Explanation:
When the timer event happens, to get a random interval next time, we must destroy
the timer with DestroyTimer ("rocket "); and create a new one
with the same name. the rand function used in CreateTimer assures
that the next timer will happen with a value between 0 and 4000 millisseconds.
To avoid zero intervals, we added 1000 more millisseconds.
Now, we can only throw the rocket if the car is close to the rocket base;
we'll use the distance function, that calculates the distance between
two points. We want then to calculate the distance among the rocket base (at
point x, y) and the "car" actor (at point car.x, car.y).
If that distance is smaller than the width of the view
(view.width) a rocket can be launched.
The launching is then made simply by creating an "rocket" actor with
the CreateActor action:
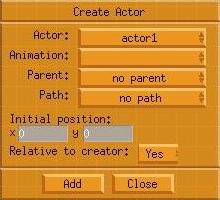
The parameters are the following :
Actor: rocket (name of the actor to be created)
Animation: rocket (animation that should be selected in actor creation)
Parent: no parent (actor parent; in this case, without parent)
Path: no path (path that the actor should follow, in this case, none)
The parameters x=0, y=0, Relative to creator = yes, indicate that the new actor
should be created in the coordinate 0, 0 relative to the creator actor; that
is, in the creator actor's same position.
Click "Ok", click "Add" in Script Editor and select "Immediate
action" to finish the action.
Click "Close" to close the panel of the event.
Cannon shot
The "shot" actor, when created, should follow
in the direction of the mouse and play a sound. Besides, when it's out of the
limits of the screen, it must be destroyed so that it doesn't wander through
the game.
Using the "Create Actor" event, add
the "Play Sound" action and specify the file
"photon.wav", lowering its volume to 30%, approximately.
Click "Add" and select "Immediate action".
Now, add the "Script Editor" action and type:
angle = direction(xscreen, yscreen, xmouse, ymouse); if(angle > 180 && angle < 270) angle = 180; if(angle > 270) angle = 0; directional_velocity = 20; |
Explanation:
To make "shot" follow the direction of the
mouse, we should calculate the angle between its current position and the mouse
pointer. We use the direction function, which returns the angle among
the line that goes through the two given points and the horizontal line:
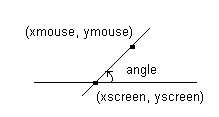
As the coordinates xmouse and ymouse are given related to the
screen, we have to use xscreen and yscreen; these are the coordinates
of the actor related to the screen.
Now that we already have the direction, we must impose a limitation to the angle,
because our cannon can't shoot downwards. Thus, we should limit the angle to
a value between 0 and 180 degrees. That is, if angle is between 180 and
270 degrees, it should become 180 degrees. If it goes above 270, it should be
assumed 0.
Lastly, we should inform the actor's speed through the variable
directional_velocity. This variable automatically adjusts the xvelocity
and yvelocity values accordingly to angle, making the actor walk
in the suitable direction.
Click "Add" in Script Editor and select "Immediate
action", to finish the action.
Click "Close" to close the panel of the event.
Another event that should be added for this actor is the "Out of Vision"
event.
This happens whenever an actor leaves the limits of the view:
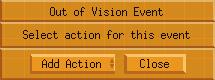
Select this event and add the "Destroy Actor"
action and specify "Event Actor", so that
"shot" is destroyed whenever it leaves of the limits of the screen.
Click "Add" and select "Immediate action"
to finish the action.
Click "Close" to close the panel of the event.
Lunar vehicle
"Car" actor will be responsible for creating some
variables needed by the game, and it should also respond to the commands of
jumping (space bar), go left (left arrow) and go right (right arrow).
Select the "Create Actor" event and
add the "Script Editor" action. To create a
variable that will be globally available in the whole game, click the button
"New Variable":
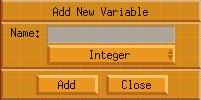
Indicate the name of the variable and its type (integer, real or string).
Create the following variables:
Variable: vel
Type: real
Purpose: to define the maximum speed of the lunar vehicle
Variable: yini
Type: real
Purpose: to keep the initial y position of the lunar vehicle. That position
will be used so that, after a jump, the actor doesn't come into the lunar soil.
Variable: jumping
Type: integer
Purpose: to indicate if the lunar vehicle is in a jump or not
Variable: tempmeter
Type: real
Purpose: to keep the current temperature of the cannon (it varies from 0.0 to
1.0)
Variable: shieldmeter
Type: real
Purpose: to keep the energy of the shield (it varies from 0.0 to 1.0)
Variable: temp_hide_x
Type: real
Purpose: to keep the initial x position of "temphide"
Variable: shield_hide_x
Type: real
Purpose: to keep the initial x position of "shieldhide"
Variable: count
Type: integer
Purpose: score counter
Now, we needed to initialize the values of the variables. Type the code:
vel = 5.0; yini = y; jumping=false; tempmeter=0; shieldmeter = 1; temp_hide_x=temphide.x; shield_hide_x = shieldhide.x; count = 0; |
Click "Add" and select "Immediate action"
to finish the action.
Click "Close" to close the panel of the event.
To move our actor, we need to add a keyboard event.
The "Key Down" event happens whenever a given key
is pressed.
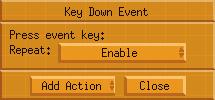
To indicate which key should generate the event, just press the wanted key.
Indicate also if there should be repetition of this event while the key is held
down.
Press the right arrow key, enable repetition and add the "Script
Editor" action. Type:
xvelocity = xvelocity + 1; if(xvelocity > vel) xvelocity = vel; |
That code will increase the horizontal speed until reaching the maximum positive
value of speed.
Click "Add" and select "Immediate action"
to finish the action.
Press the left arrow key, enable repetition and add the "Script
Editor" action. Type:
xvelocity = xvelocity - 1; if(xvelocity < -vel) xvelocity = -vel; |
That code will reduce the horizontal speed until reaching the maximum negative
value of speed.
Click "Add" and select "Immediate action"
to finish the action.
Press the space bar, disable repetition and add the "Script
Editor" action. Type:
if(y >= yini)
{
  yvelocity = -15;

  jumping=true;
}
|
If the actor is in its initial vertical position (yini), this code alters
its vertical speed to -15, making the lunar vehicle jump. Indicate that the
actor is jumping in jumping variable, that will be used later.
Click "Add" and select "Immediate action"
to finish the action.
Click "Close" to close the panel of the event.
Now, to make the lunar vehicle move as we want, we need to:
- simulate the gravity effect
- make that, after a jump, the actor leaves a trace and lifts dust
- move the view so that it follows the actor.
- simulate the effect of friction, to reduce the speed of the horizontal movement
All this should be made in the "Draw Actor" event:
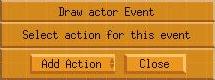
The "Draw Actor" event happens whenever the screen will be redrawn.
Select that event and add the "Script Editor"
action. Type:
yvelocity = yvelocity + .5;
xvelocity *= .95;
view.x = x - view.width/2.0;


if(y > yini)
{
  y = yini;
  if(jumping)
  {
    jumping=false;
    CreateActor("sand", "sand", "no parent", "no path", 0, -30, false);

    CreateActor("cartrace", "trace", "no parent", "no path", 0, -10, false);
  }
}
|
Explanation:
We simulate the gravity effect increasing the actor's vertical speed yvelocity
at each screen redraw.
The horizontal friction is simulated reducing the actor's horizontal speed.
Here, we reduced xvelocity at 95% of its value at each redraw.
We want that the actor be always centralized horizontally in the screen. For
that, we altered the horizontal position of the view (view.x), making
it equal to the actor's current position plus the half of the width of the view.
As the gravity effect takes the actor down, to avoid it to run through the lunar
soil, we should set its y position to the initial vertical position yini,
whenever y goes larger than yini.
If y happens to be larger than yini, we should verify if the actor
is finishing a jump (jumping = true).
If it is the case, set jumping = false indicating that the jump finished
and create the actors "sand", to lift dust, and
"cartrace", to leave a trace on the lunar
soil:
To create the dust, select the "CreateActor"
action in the function list with the parameters:
Actor: sand
Animation: sand
Parent: no parent
Path: no path
x: 0
y: -30 (so that "sand" is positioned correctly under "car")
Relative to creator: yes
Click "Ok".
To create the trace, select the "CreateActor"
action in the function list with the parameters:
Actor: cartrace
Animation: trace
Parent: no parent
Path: no path
x: 0
y: -10 (so that "cartrace" is positioned correctly under "car")
Relative to creator: yes
Click "Ok".
Finally, click "Add" and select "Immediate
action" to finish the action.
Click "Close" to close the panel of the event.
Cannon
The "gun" actor represents the cannon of the lunar
vehicle. It should always point in the direction of the mouse. When the right
ctrl key is pressed, it should create a "shot",
if the cannon is not too hot.
Using the "Draw Actor" event, add "Script
Editor" action and type:
double mouseangle = direction(xscreen - 45, yscreen, xmouse, ymouse); animpos = (mouseangle/180.0)*(nframes-1); if(mouseangle > 179 && mouseangle < 270) animpos = nframes-2; tempmeter = tempmeter*.98; temphide.x = 100*tempmeter + temp_hide_x; |
Explanation:
To make "gun" point in the direction of the mouse, we should calculate
the angle between its current position and the mouse. For that, we used the
direction function, previously explained. Notice that
we decrease xscreen by 45 to adjust the center of the cannon in relation
to the mouse.
With the calculated direction, we will use it to show the correct picture of
the animation.
The animpos variable is for indicating which frame
of the animation it should be shown, counting from frame 0. The nframes
variable keeps the amount of frames of the current animation. Thus, we can adjust
the animation frame according with the direction between the cannon and the
mouse.
As our animation must turn just 180 degrees, we need to limit animpos, to avoid
that, when the mouse is on the left side and below the cannon, it aims to the
right side.
Lastly, we adjust the temperature reducing tempmeter to 98% of the current
value and position temphide according to that value. So, if tempmeter
= 0, temphide.x = temp_hide_x (initial position of temphide) and if tempmeter
>= 1, temphide moves to the right, letting "meter"
appear completely.
Click "Add" in Script Editor and select "Immediate
action" to finish the action.
Click "Close" to close the panel of the event.
We must also add "Key Down" event. Press the right
ctrl key, disable repetition and add the "Script Editor"
action. Type:
tempmeter = tempmeter + .12;
if(tempmeter < .95)
{
  CreateActor("shot", "shot", "no parent", "no path", -35, -15, false);

}
|
Explanation:
The cannon should heat a little whenever we shoot. For that to work, we should
increase tempmeter by a small amount. If that value is below the critical
limit of 95% we can shoot, creating the "shot" actor.
To create the shot, select the "CreateActor"
action in the function list with the parameters:
Actor: shot
Animation: shot
Parent: no parent
Path: no path
x: -35
y: -15
Relative to creator: yes
The parameters x and y should be chosen so that the shot leaves from the correct
place in the cannon.
Click "Ok".
Click "Add" and select "Immediate action"
to finish the action.
Click "Close" to close the panel of the event.
Rocket
The "rocket" actor, when created by the actor
"rocket_base", should fly upwards initially.
When it is destroyed, it should create an "lightex"
actor, to show a bright explosion. While it's flying, the rocket should go towards
the lunar vehicle. If the lunar vehicle discharges a shot, the rocket it should
follow it. When there is a collision with a canyon shot, the rocket should be
destroyed and the accountant of the score should be modernized. When the rocket
collides with the lunar vehicle, the rocket should be destroyed and the field
of force of the decreased car.
So that the rocket is created and fly upward, select the "Create
Actor" eventand add the "Script Editor"
action, and type:
yvelocity = -50; |
That makes the rocket fly upwards.
Click "Add" and select "Immediate action"
to finish the action.
Click "Close" to close the panel of the event.
To make the rocket create the explosion when destroyed, select the "Destroy
Actor" event, that happens whenever the actor is destroyed, and add the
"Create Actor" action with the parameters:
Actor: lightex
Animation: light explosion
Parent: no parent
Path: no path
x: 0
y: 0
Relative to creator: yes
Click "Add" and select "Immediate action"
to finish the action.
Click "Close" to close the panel of the event.
We will now make the rocket move as we want. Select the "Draw
Actor" event , add "Script Editor" action
and type:
double targetangle;
int n = ActorCount("shot");

if(n > 0)
  targetangle = direction(x, y, shot.x, shot.y);
else
  targetangle = direction(x, y, car.x, car.y);

vectoradd(&angle, &directional_velocity, targetangle, 1);

directional_velocity = min(directional_velocity, 10);
animpos = (angle/360.0)*nframes;
|
The targetangle variable holds the direction between the rocket and
its aim, that can be a "shot" actor or the "car". If an
"shot" exists, the rocket should follow it. To verify if there is
a "shot" actor in the game, we use the ActorCount
function, that takes an actor's name and returns how many of them exist in the
game.
Notice that we didn't use xscreen or yscreen
in direction, since here we have the x
and y coordinates of both actors.
To avoid that the rocket instantly change its direction, and instead proceed
smoothly to the new direction, we have to add the new direction to the current
movement of the rocket. The vectoradd function does that for
us. It takes as parameters the angle and the speed of the current movement,
and the angle and the speed that we wants to add. The result of the addition
is returned in the first two parameters; that's why they should be preceded
with the & (ampersand).
Now, to keep the rocket from indefinitely increasing speed, we use the min
function (that returns the minimum value among two values) to limit the speed
to10.
Finally, with the rocket in the correct direction, we adjuste the animation
frame through animpos.
Click "Add" and select "Immediate action"
to finish the action.
Click "Close" to close the panel of the event.
We are now going to treat the collision events that happen between " rocket"
and "car", and "rocket" and "shot".
Select the Collision event and choose "shot"
actor:
Add the "Destroy Actor" action and select
"Event Actor".
Click "Add" and select "Immediate action"
to finish the action.
Now add the "Script Editor" action and type:
count = count + 5; score.textNumber = count; |
When the rocket is destroyed by a cannon shot, we should increase the value
of the score controlled by the count variable. Then, we
update the score actor, that represents the score. That's
made by the property textNumber.
Click "Add" and select "Immediate action"
to finish the action.
Click "Close" to close the panel of the event.
Select once more the Collision event and choose "car":
Add the "Destroy Actor" action and select
"Event Actor".
Click "Add" and select "Immediate action"
to finish the action.
Now add the Script Editor action and type:
shieldmeter = shieldmeter*.98; shieldhide.x = shield_hide_x - shieldhide.width*(1.0 - shieldmeter); |
When the rocket is destroyed by colliding with "car", we should
decrease the shield value of "car".
So, we reduced shieldmeter to 98% of the current value and
positioned the shieldhide actor according to that value. This way, if
shieldmeter = 0, shieldhide will wholy hide shield_meter.
If shieldmeter = 1, the "shield_meter" actor appears
entirely, indicating that the shield has 100% of its power.
Click "Add" and select "Immediate action"
to finish the action.
Click "Close" to close the panel of the event.
That's all...
The tutorial presented here tried to enlighten many of the concepts used by
Game Editor. Not everything was shown here,
and the game presented still has a lot to evolve; just use your imagination.
Remember: a tutorial like this is made so that you don't start alone; its purpose
is to enable you to go a step ahead.
Don't be limited just to what was said. Try to exchange ideas and to clear your
doubts in Game Editor forum, read
its documentation and study
the demos and tutorials that come in Game Editor distribution package.